Raspberry Pi Projects
Laser Gate
It is easy to use the Raspberry Pi for laser gate timing. We describe below
how we have set up our Raspberry Pi 4B for measuring time and velocity of an
object in our physics laboratory.
Raspberry Pi pin connections
Below we show a diagram of how the Raspberry PI is connected to the detector. We use
3 pins on the Raspberry Pi: Pin 1, 7, and 9. Pin 1 is 3.3 volts, and pin 9 is ground.
We sample pin 7 to see if the laser is incident on the detector or blocked.
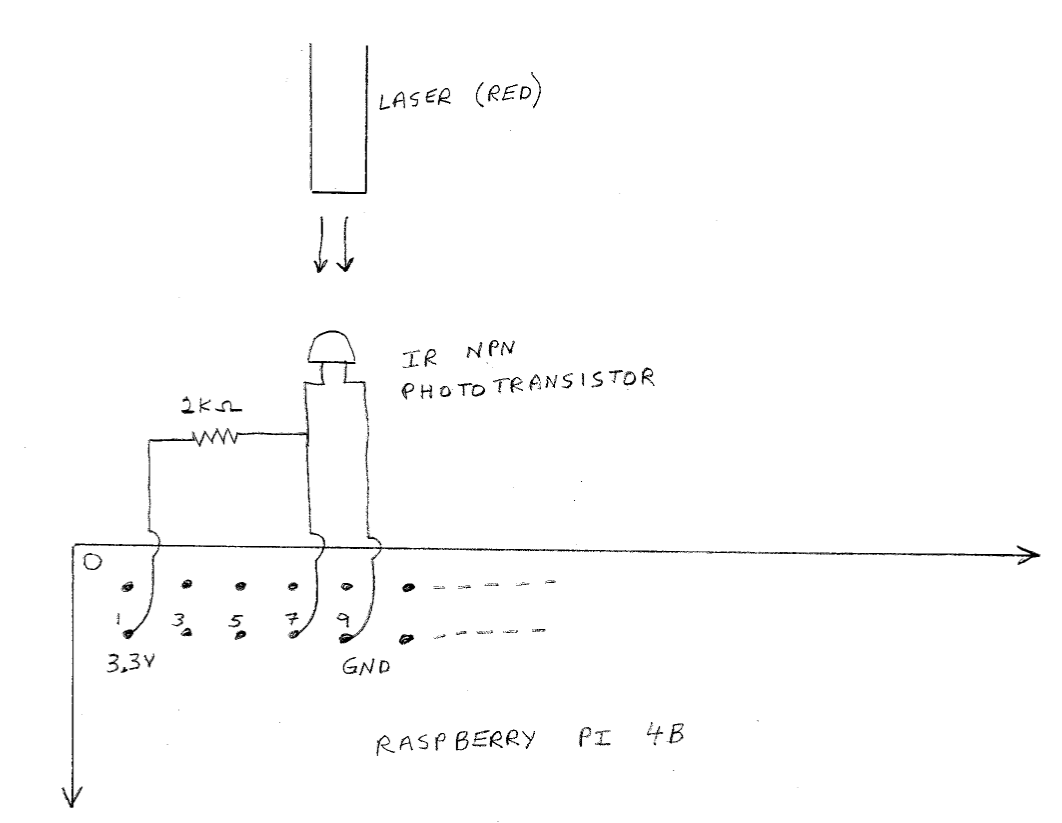 It is important to have the correct IR phototransistor. The one we use is model
SDP8405-003 made by Honeywell, and has the following properties. When there is
no infra-red light incident on the phototransistor, it's resistance is above
5 kΩ. With IR light incident on the phototransistor, the resistance drops
below 800 Ω. Thus, the voltage on pin 7 is the following: no incident IR
light V>3.3(5/7)>2.3 volts, IR light incident V<3.3(800/2800)<1 volt. The
2 kΩ pullup resistor is just right to cause pin 7 to read "1" when no IR light
is incident, and "0" when IR light is incident on the detector. It is important to
use a red laser that has some IR radiation in its beam. The visible light in the
room will not affect the detector as long as it isn't light from the sun.
It is important to have the correct IR phototransistor. The one we use is model
SDP8405-003 made by Honeywell, and has the following properties. When there is
no infra-red light incident on the phototransistor, it's resistance is above
5 kΩ. With IR light incident on the phototransistor, the resistance drops
below 800 Ω. Thus, the voltage on pin 7 is the following: no incident IR
light V>3.3(5/7)>2.3 volts, IR light incident V<3.3(800/2800)<1 volt. The
2 kΩ pullup resistor is just right to cause pin 7 to read "1" when no IR light
is incident, and "0" when IR light is incident on the detector. It is important to
use a red laser that has some IR radiation in its beam. The visible light in the
room will not affect the detector as long as it isn't light from the sun.
C program to collect the data
We use a C program to collect the data, and an HTML program to graph the results. The
C program tandvel.c is used to collect the data. The GPIO pin
number 7 is read using a nice GPIO interface library for C found at
wiringPi (Thanks Dan for writing this nice resource).
Compile the program tandvel.c by typing "gcc -lwiringPi tandvel.c". Run the code by
typing "./a.out" or rename the object file when compiling by adding "-o filename".
The menu will describe the different options. To collect data, type "d" then return. The clock will
start when return is pressed. The time and speed data are displayed and the file data.txt is produced
for graphing.
Other C programs for the Raspberry Pi
- detectest.c This program can be used to test if the detector is responding
correctly when the laser is incident on it. Pin 7 is read 20 times in succession with a half second delay
between readings. After each reading, a zero or one is printed on the screen to signify if the beam is
detected or not. To compile type "gcc -lwiringPi detectest.c -o detest". To run type "./detest".
- timertest.c This program can be used to test if the onboard timer is working
properly. The onboard clock is read 10 times in succession, and the times are printed on the screen in
nanoseconds. One can also see how fast the clock can be read, which should be a little more than
a micro-sec. To compile type "gcc timertest.c -o ttest". To run type "./ttest".
- tandvsave.c
- accvelcalc.c
- tandvfpi.c
- tandvfpisave.c
Nodejs programs for the Raspberry Pi
- tandvfpi.js
- tandvsave.js
HTML program to graph and analyze the data
Once tandvel.c is run, a file called data.txt will be produced. Run the following code
graphdata2.html in a browser. Upload the file data.txt, and
see the data graphed. Hit the "fit it" button to see the best straight line fit and the
slope plus intercept values.
Siegel's Home Page
Physics Department|
College of Science