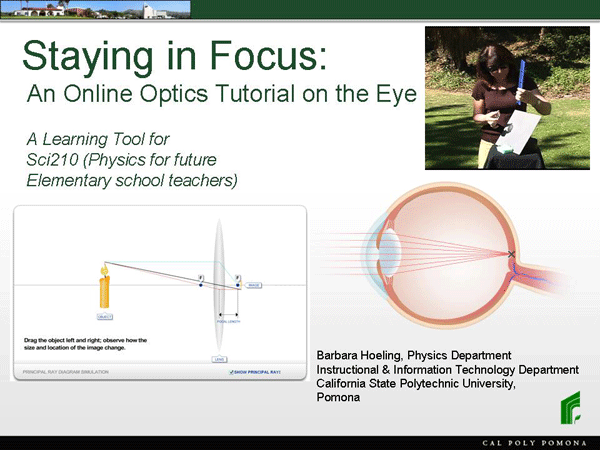
Staying in Focus
an Online Optics Tutorial on the Eye
Welcome to: "Staying in Focus – an Online Optics Tutorial on the Eye", created at Cal Poly Pomona by Barbara Hoeling of the Physics Department in collaboration with the wizards of I&IT (Instructional & Information Technology), and with the support of the TQE (Teacher Quality Enhancement) grant. This tutorial will teach you some basic geometrical optics and give you ideas on how to do simple experiments with lenses. You will learn how lenses form images, how your eye works, and why people need eye glasses.
Let me explain briefly how you should work with this tutorial.
The tutorial contains three short videos that demonstrate how you can do experiments with lenses. In addition, slides with graphics and narration explain the physics. There are also interactive animations that allow you to do "virtual" experiments, and to explore these concepts in more detail. Please take your time playing with the interactive animations, and make sure you are observing carefully what happens. The questions posed throughout the tutorial are meant to guide you in your studies, and to help you identify the key points you have to understand.
One more remark: In this tutorial, you are using the ray model of light, which describes light rays as propagating in straight lines. This is in contrast to the wave model of light, which describes light as an electromagnetic wave. Certain optical phenomena, such as interference and diffraction, can only be understood within the framework of the wave model of light, and will therefore not be considered in this tutorial.
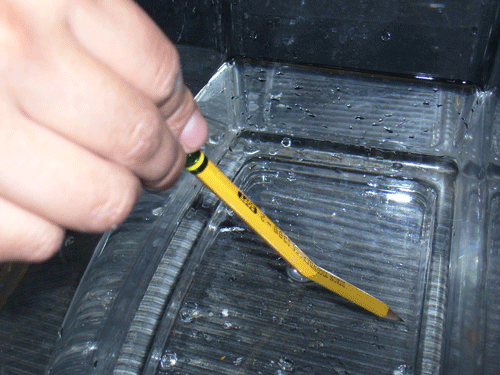
Have you ever observed what happens when you stick a pencil in a glass of water, and then look at it from different directions? This picture shows you that the pencil doesn't seem to be straight any more, it looks like it has a kink! What does this mean?
Shining a laser beam, for instance from a laser pointer, onto a bowl of water can give us a clue: the light beam does not continue straight at the border between air and water, it has a kink! The phenomenon is called refraction: a light ray bends when it goes from air into water, or vice versa, or from glass into air, or vice versa – generally, when it goes from one medium into another. When we use optical lenses, we are taking advantage of the refraction of light.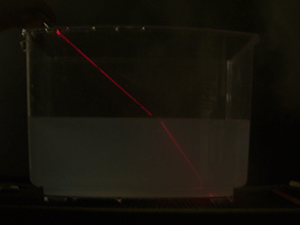

We just observed how a convex lens bundles the light rays from the sun into a single bright spot. This means that a convex lens refracts light in a very special way, as this graphic will illustrate. It shows a lens from the side, and light rays coming in from the left. Rays near the middle of the lens are not changing direction very much. But rays that hit the lens closer to its rim are bent much more, such that all rays meet in one point, the focal point of the lens. The distance between the lens and the focal point is called the focal length of the lens. As we have shown in our experiment in the sun, a thicker lens has a shorter focal length than a thinner lens.
To understand in greater depth why a convex lens refracts light in this special way, have a look at "Snell's Law" on page 4 of the Online Optics Module "Refraction & Lenses".
http://www.csupomona.edu/~bmhoeling/RefractionLenses_4/
This interactive animation demonstrates how the focal length of a lens changes with its thickness. Like in the previous slide, the lens is shown from the side, and light rays are coming in from the left. Click on the arrows on the lens and pull to make the lens longer and thinner, or squeeze it to make it shorter and thicker. Then observe what happens to the focal point. Keep playing with the animation for a little bit. This squeezable lens in the animation is actually a model for the lens in your eye, which is surrounded by a muscle, called the ciliary muscle. When this muscle contracts, it squeezes the lens of the eye, which is made of elastic fibers: The lens gets thicker. You should now be able to answer the question: How does the focal length of the eye change when the ciliary muscle contracts? – We have seen how a convex lens bundles the light rays that are coming in from very far away. But a lens can do much more than that: It can actually produce an image of a bright object! We will explore this in the next video.
We have seen in the last video that a convex lens indeed makes an image of our object, the little lit arrow. But how exactly is this image formed? This animation shows you that light rays are going off in all directions from every point of the object. Let's look at one specific point of the object, say the very tip of the arrow. We know that the lens makes all light rays that are coming from this one point converge in one other point, the image of the tip of the arrow. But how do we know where this image point is located? There are three special rays for which we actually know the path. These three rays are called the principal rays. The first one is the one that hits the lens in the middle and goes right through without changing direction. The second one is the ray that goes parallel to the optical axis, so it hits the lens right on, the same way the sun rays hit it in the first experiment. Of course we know where such a ray goes: through the focal point! Now we can see where the image point of the tip of the arrow is located: at the intersection of these two principal rays! We can draw in a third principal ray just for confirmation: A ray that goes through the focal point of the lens leaves the lens parallel to the optical axis. And indeed, this ray also crosses with the two others in the same point! We can now find the image point for every point of the object in the same way - we can construct our image. What we find for the configuration that is shown here is: The image is smaller than the object, the original arrow, and it is upside-down, just as we observed in the video. So for this particular distance between the object and our lens, we are getting a reduced, inverted image.
Here you can see what is called a principal ray diagram. We have constructed the image of the candle from the three principal rays, as we explained before. This interactive animation allows you now to move the object relative to the lens, and to observe what happens to the image. Click on the object, the candle on the left, and drag it to different positions. The three principal rays are always constructed the same way: one goes straight through the middle of the lens, one goes parallel to the optical axis, and then through the focal point, and one goes through the focal point between the object and the lens, and leaves the lens parallel to the optical axis. Take some time moving the object back and forth, and try to answer the following questions: What happens to the position of the image when you move the object closer to the lens? What happens to the size of the image when you move the object closer to the lens? You will notice that the animation does not allow you to move the object closer than about two focal lengths to the lens. That's because we are trying to simulate the situation for our eye: Everything we look at is a lot further away from our eye than the size of our eyeball, which is about one inch in diameter. We'll come back to this in a moment. For now, make sure that you also observe what happens when you move the object further and further away from the lens. Where does the image move? Remember what we concluded from our experiment in the video about the position of the image of a very far away object? Is this consistent with the result of this simulation?
We have been talking about lenses, and how they can make images. But what does all of this have to do with the human eye? This schematic of a human eye should help us make the connection.
The eye is basically a hollow globe with a radius of a little less than an inch that is covered with a tough white coating, the sclera. Light rays entering the eye first go through the cornea, a transparent tissue, and the anterior chamber which is filled with a watery fluid called aqueous humor. Then they pass through the pupil, the circular opening in the iris that gets smaller when there is a lot of light, and larger when the light is dim. The pigments in the iris determine whether your eyes are blue, green, gray, or brown. Behind the iris lies the lens, which is about the size and shape of a small lime bean. The ciliary muscle surrounds the lens like a ring, and when it contracts, it squeezes the lens and makes it thicker. After passing through the lens, the light rays go through the fluid called vitreous humor that fills the hollow globe, and finally hit the retina at the inside back of the eye. The eye as a whole is quite a complex and amazing biological structure. But as a simplified model, you can imagine that cornea and lens act together like a single convex lens that produces an image of an object far outside of the eye. The screen where this image must appear, sharp and in focus, is the retina, or net. The retina is dotted with cells that can detect light, and these cells pass on the information they receive via the optic nerve to the brain.
Remember how we showed in the last video and in the following animation that the image of a very distant object is located essentially at the focal point of the lens. This means that, in order to see distant objects in focus, the retina must be located at the focal point of the cornea/lens system of the eye. Of course the retina is attached to the back of the eyeball and therefore in a fixed position – the screen in this optics arrangement cannot be moved. But for a normal sighted eye, the eyeball has just the right size such that the focal point of the cornea/lens system is located on the retina. On the other hand, there are many people whose eyeballs do not have the exactly right length for their particular cornea/lens combination. However, if they combine their eyes with another lens, that is, if they wear eye glasses, they can correct their vision problems. In the next video, we will explore how combinations of lenses work.
We have seen in the last video how we can shift the focal point if we add a second lens to the original convex lens that is the model for our eye. This interactive animation lets you explore how to correct the vision problems of near sightedness and far sightedness. You can select either a near sighted eye, for which the eyeball is too long, or a far sighted eye, which has too short of an eyeball. You can then choose the appropriate type of eye glasses that will move the focal point onto the retina. For comparison, there is also a normal sighted eye for which the focal point is located on the retina. This eye sees distant object in focus, without the help of glasses. Play with the different arrangements, and describe what happens when you combine each of the eyes with a convex and with a concave lens. Make sure you understand which correction lens belongs to which vision problem, and why. Note how the concave lens in front of the eye spreads out the incoming rays, such that after passing through the eye's lens, they are not focused as close to the lens as before. The convex lens in front of the eye does just the opposite: now the focal point is closer to the lens than without it. And here is a tricky question: How come far sighted people can actually see far away objects just fine in focus, without eye glasses? Remember that the lens can be squeezed – and so far, we have looked at the eye only with the lens relaxed, that is, with the lens as thin as it can get.
So far, we have only been considering objects that are very far away from the eye. But your eyes are also capable of seeing things in focus that are closer by. How can that be? In the interactive animation on slide 10, you could verify what happens to the image when the object moves closer to the lens: the image becomes larger, and moves further away from the focal point. We cannot move the retina further away from the lens, so there is only one solution to the problem: We have to change the focal length of the cornea/lens system, and move the focal point inside the eyeball. How can this be achieved? The cornea cannot change, but fortunately, as we have pointed out already a couple of times, the eye's lens can be squeezed by the ciliary muscle, and thereby made thicker.
In this interactive animation, you can explore how the lens of the eye adjusts its thickness. This allows you to see an object in focus as it is moved to different distances from the lens. Drag the object to another position and observe how the lens changes. When you are looking at a very far away object, the lens of your eye is as thin as it can get, that means the ciliary muscle around your lens is relaxed. When you want to look at a closer object, your brain signals to the ciliary muscle to contract. This makes the lens thicker, which means its focal length becomes shorter. This way, the image is always located at the retina, and you see things in focus, no matter whether they are far or close. Keep playing with the animation and observe what happens! Try to answer the following questions: When you bring the object from far away closer, what happens to the size of the image? To the position of the image? To the shape of the lens? To the focal points of the lens?
This completes our online optics tutorial on the eye. We hope you enjoyed working through it! And remember: ALWAYS STAY FOCUSED!!!